Deploying Neptune: Reaching for the Stars
Neptune is your gateway to a world where students collaborate, connect, and aim for the stars. With features like an AI chatbot, class lists, chatrooms, a friends list, and customizable themes, Neptune fosters a thriving student community.
Follow these steps to deploy Neptune and ensure everything runs smoothly!
System Architecture
Below is an overview of Neptune’s architecture:
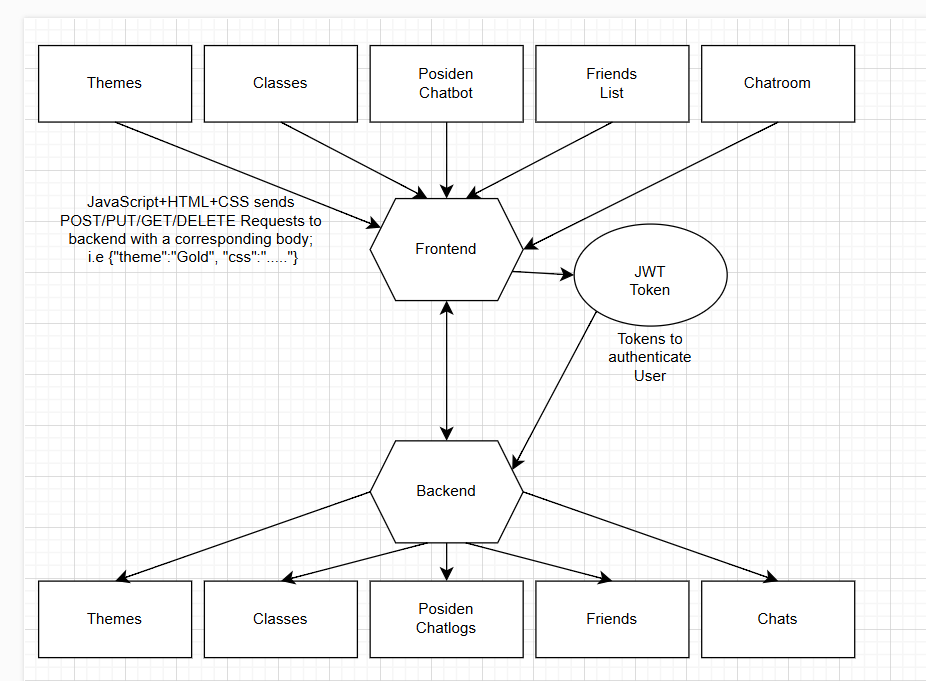
Here is an image of the chatroom in depth, since it uses WebSocket.
.png)
Changing Code in VSCode
To keep deployment working, good practices in your coding process with verifications prior to pushing code to GitHub will save a lot of troubleshooting.
1. Pull Changes:
- Before making changes:
git pullin the VSCode terminal.- This ensures you have the latest code from your team and prevents merge conflicts.
2. Local Testing:
- Open terminal in VSCode:
cdinto your repository. - Run:
python3 main.py - This starts your Flask application locally.
- Open the local address in your browser: View your changes live.
- Make changes: Refer to your running site frequently to see changes in real-time.
3. Commit Changes:
- Commit your changes locally: Use meaningful commit messages.
- Do not sync or push yet: Committing allows you to pull team changes for further verification.
4. Docker Desktop Testing:
- Start Docker Desktop.
- Run:
docker-compose uporsudo docker-compose upin the VSCode terminal. - Access the application:
- Open
http://localhost:8212in your browser - Replace
<port>with your port number.
- Open
- Test thoroughly: Review your changes and team members’ changes.
- Debug errors: If any errors occur, they will appear in the browser or VSCode terminal.
- Note: Docker Desktop can consume resources. Close it after testing if you’re unplugged.
5. Push to GitHub:
- If all tests pass:
- Sync changes from the VSCode UI or
git pushfrom the terminal.
- Sync changes from the VSCode UI or
- If you encounter issues:
git statusto review open files.- Resolve conflicts: Use
git restoreorgit commit. git pullagain and repeat steps 2-4.
6. Deploying to AWS EC2:
- In your AWS EC2 terminal:
- Navigate:
cd ~/neptune_frontend - Stop the current deployment:
docker-compose down - Verify downtime: The server should be down (502 Bad Gateway).
- Pull changes:
git pull - Rebuild:
docker-compose up -d --build - Test again: The server should be updated and running.
- Navigate:
7. Optional Troubleshooting Checks (AWS EC2):
- Check server status:
curl localhost:8212 - Verify container status:
docker-compose psdocker ps
### Test Server
Ensure that we have a working frontend-to-backend test server. If it does not work locally, there is no need to try it on deployment.
Subdomain
Setup DNS endpoint through AWS Route 53.
Server: https://neptune_backend.nighthawkcodingsociety.com/
Domain: nighthawkcodingsociety.com
Subdomain: neptune_backend
Port (Backend)
Select a unique port for the application. Update all locations:
- main.py: Prepare the localhost test server port to run on the same port for consistency.
Changed port to 8212
if __name__ == "__main__": app.run(debug=True, host="0.0.0.0", port="8212") - Dockerfile: Prepare this file to run a server as a virtual machine on the deployment host.
FROM docker.io/python:3.11 WORKDIR / RUN apt-get update && apt-get upgrade -y && \ apt-get install -y python3 python3-pip git COPY . / RUN pip install --no-cache-dir -r requirements.txt RUN pip install gunicorn ENV GUNICORN_CMD_ARGS="--workers=1 --bind=0.0.0.0:8212" EXPOSE 8212 ENV FLASK_ENV=production CMD [ "gunicorn", "main:app" ] - docker-compose.yml: Prepare this file to serve as the “make” for Docker.
version: '3' services: web: image: flask2025 build: . env_file: - .env ports: - "8212:8212" volumes: - ./instance:/instance restart: unless-stopped - nginx_file: Prepare this file for reverse proxy (the way this works is that the information is sent from the internet to the application and back to the requester.)
server {
    listen 80;
    listen [::]:80;
    server_name neptune_backend.nighthawkcodingsociety.com;
    location / {
        proxy_pass http://localhost:8212; (MINE)
        if ($request_method = OPTIONS) {
            add_header "Access-Control-Allow-Credentials" "true" always;
            add_header "Access-Control-Allow-Origin"  "https://nighthawkcoders.github.io" always;
            add_header "Access-Control-Allow-Methods" "GET, POST, PUT, DELETE, OPTIONS, HEAD" always;
            add_header "Access-Control-Allow-MaxAge" 600 always;
            add_header "Access-Control-Allow-Headers" "Authorization, Origin, X-Origin, X-Requested-With, Content-Type, Accept" always;
            return 204;
        }
    }
}
Port (Frontend)
Prepare the frontend to access our domain and ports to match our localhost, port 8212 (OURS OURS OURS OURS OURS), and domain settings.
-
assets/api/config.js: Changed port to 8212
export var pythonURI;
if (location.hostname === "localhost" || location.hostname === "127.0.0.1") {
    pythonURI = "http://127.0.0.1:8212";
} else {
    pythonURI = "https://flocker.nighthawkcodingsociety.com";
}
Accessing AWS EC2
Login to AWS Console using our account. (Yash321, ask him for password [we know it just don’t wanna put in blog]) Access EC2 Dashboard and launch an instance. Select CSP
Application Setup
- Finding a Port: Run
docker psto make sure port 8212 is open - On localhost setup Docker files using VSCode: Make sure the Dockerfile and docker-compose.yml match port 8212 on AWS EC2.
- Use docker-compose up in the repo folder
- Access the server after it’s done building in browser on localhost:8212
Server Setup
- Clone backend repo:
git clone https://github.com/DNHS-Neptune/neptune_backend.git - Navigate to repo:
cd neptune_backend - Build site:
docker-compose up -d --build - Test site:
curl localhost:8212
Route 53 DNS
Go to AWS Route 53 and setup DNS subdomain for backend server.
Nginx setup
- Navigate to nginx:
cd /etc/nginx/sites-available - Create an nginx config file:
sudo nano neptune_backend - Activate configuration:
cd /etc/nginx/sites-enabled, thensudo ln -s /etc/nginx/sites-available/neptune_backend /etc/nginx/sites-enabled - Validate:
sudo nginx -t - Restart nginx:
sudo systemctl restart nginx
Certbot Config
Run command below and follow prompts:
sudo certbot --nginx
Changing Code will require Deployment Updates
- Run git pull before making changes
- Open terminal in VSCode and run python main.py
- Make changes that are needed
- Commit the changes locally
- Test docker-compose up or sudo docker-compose up in VSCode terminal
- Sync change from UI/git push from terminal
Pulling Changes into AWS EC2 deployment
- Navigate to repo:
cd ~/neptune_backend - docker-compose down
- git pull
- Rebuild docker container:
docker-compose up -d --build
Troubleshooting checks on AWS EC2
- Try to curl:
curl localhost:8212 - Run docker-compose ps
- Run docker ps
AWS Flowchart (How it works/Process)
First time Install
1. In your project directory, create a .env file with passwords of the users
2. Run ./scripts/db_init.py
- This will initialize the database and reset all the data tables.
3. In your repo run Docker commands
- Run:
docker-compose build - Run:
docker-compose up -d
Test your server
-
Curl provides text response of your requested page
- Look for your application and port:
docker ps - Verify your application is working:
curl localhost:8212
Note
- Do not put user passwords in your blogs or in your code since it’s a security risk
- Do not commit them to GitHub
- Use the
.envfiles to store passwords. Add.envto your.gitignorefile.
NGINX & Certbot Setup
Route 53 DNS
Go to AWS Route 53 and set up a DNS subdomain for the backend server.
NGINX Setup
-
Go to nginx directory and create an Nginx config file:
cd /etc/nginx/sites-available sudo nano neptune_backend -
Add the following config:
server { listen 80; listen [::]:80; server_name neptune_backend.nighthawkcodingsociety.com; location / { proxy_pass http://localhost:8212; if ($request_method = OPTIONS) { add_header "Access-Control-Allow-Credentials" "true" always; add_header "Access-Control-Allow-Origin" "https://nighthawkcoders.github.io" always; add_header "Access-Control-Allow-Methods" "GET, POST, PUT, DELETE, OPTIONS, HEAD" always; add_header "Access-Control-Allow-MaxAge" 600 always; add_header "Access-Control-Allow-Headers" "Authorization, Origin, X-Origin, X-Requested-With, Content-Type, Accept" always; return 204; } } } -
Save the file (
Ctrl + X, thenY, thenEnter). -
Activate configuration:
cd /etc/nginx/sites-enabled sudo ln -s /etc/nginx/sites-available/neptune_backend /etc/nginx/sites-enabled -
Check for all proper configs and restart Nginx:
sudo nginx -t sudo systemctl restart nginx -
Test if Nginx is serving requests:
Open http://neptune_backend.nighthawkcodingsociety.com in our browser.
Certbot Configuration for HTTPS
Here are all the steps we will follow to install Certbot to deploy our site
-
Install Certbot:
sudo apt-get install certbot python3-certbot-nginx -
Run Certbot to get SSL certificate:
sudo certbot --nginx - Follow the prompts:
- Select
neptune_backend.nighthawkcodingsociety.comfrom the list. - Choose option
2because it will redirect us from HTTP to HTTPS, which is more secure.
- Select
-
Restart Nginx:
sudo systemctl restart nginx - Test HTTPS access:
Open https://neptune_backend.nighthawkcodingsociety.com in our browser.
Updating Deployment
Changing Code in VSCode
Steps:
- Run
git pullbefore making changes. - Open terminal in VSCode and run
python main.py. - Make changes that are needed.
- Commit the changes locally.
- Test
docker-compose uporsudo docker-compose upin VSCode terminal. - Push changes to GitHub.
Pulling Changes into AWS EC2 Deployment
-
Navigate to repo:
cd ~/neptune_backend -
Stop running containers:
docker-compose down -
Pull the latest code:
git pull -
Rebuild the docker container:
docker-compose up -d --build
Debugging NGINX
-
If something fails, we will check Nginx logs:
sudo tail -f /var/log/nginx/error.log